Update 19 – Originally Posted - Mon Aug 30, 2010 9:51 pm
http://preludeuk.forumup.com/viewtopic. ... =preludeuk
Update continued....this is quite a long one I'm afraid

Another change of scenery again - this time we're going inside for some ventilation and dashboard work.
I had already junked all the original heavy and cumbersome heater/climate control system parts and although we have found some useful products for keeping the windscreen clear from misting up in the rain I still wanted to add some form of ventilation to assist screen demisting and/or driver cooling.
I decided I wanted some kind of windscreen de-mister to help keep the screen clear during wet races. The Prelude screen vents are built into the car body so that should make things easy.

Powerful yet small and light self contained electric fan, coupled with ducting hose and a plastic funnel duct mounted to the underside of the vents

Better shot of the fan

Decided the air drawn from outside the car would be best for screen clearing ability. This is the same place that the OEM fan picks it's air from and is a good a spot as any.


Complete screen de-mister setup. The beauty of this simple setup is that the output ducting can easily be released and another duct hose added to direct air at the driver (me) on a hot day.

With that little job done it was now time for the task that in all honesty I wasn't really looking forward to. I have done plenty of dash chops in the past to get them in around a cage so I know just how time consuming this can be. On top of that I also wanted to get the whole thing as light as I could within reason.
Alot of people would simply delete the dash altogether but to me a car is not complete without one. It also gives all the space needed for gauges and keeps things tidy out of view. Another reason I wanted to keep it was to retain some of the Prelude's character. It's going to be a challenge getting it in around all the cage bars though!!!!


To start with I thought it'd be a good time to weight it. Nearly 12 KGs... gotta do something about that !!


As you can see there is quite alot of dash to a 4th gen Prelude

First remove all the easy stuff that won't be needed.

Then remove all the remaining screws holding the "crash pad" to the main plastic dash itself

Then remove the crash pad carefully from the rest of the dash. This was pretty tricky and quite tough going as it was glued all round as well as screwed together.

This is the main dash and quite a weighty piece it is too considering it's plastic !!

Remains of glue that held the two pieces together


All the dash parts separated

The big hole in the centre here is the dash locating mount. There is a corresponding post built into the car to align the dash centrally. I decided this might be helpful

Also the very top of the dash has the screen vents/defusers which would also come in handy

Dash very top section cut away from remainder of dash which will be consigned to the skip


First trial fit of the vent part of the dash, lovely...not much trimming to do to this bit at all.


Onto the main body ofthe dash or moreto the point the remaining crash pad part of the dash. Decided to mark out and start trimming small and enlarge as required..this was a one shot deal as I didn't have a spare dash!! Note the vent section is now re-attached.

Trimmed and installed - note I had to extend the trimming back towards the inside of the car to allow the dash to level up against swept back cage tubes.


Purely by chance and total good fortune the dash clears the "Pit Prop" tubes by just about the right amount. Bear in mind that the cage was never designed to work around the dash and that the dash was never anywhere near the car when the cage was being designed and built.

Basic dash fitted - Still a bitch to get in and out as it has to be twisted into place through the windscreen opening.


Closer view of dash fitment around roll cage tubing.

Centre support drilled and lightened, will be painted before final dash fitment but for now it is used "as is" for mock up purposes

Mocked up with centre support now attaching dash to the floor via fabricated mount. Note also pair of thin braces to help dash retain it's shape

N/S dash end plate fabricated from 1mm alloy sheet. These will eventually be attached to the roll cage for dash support

And the same thing done to the O/S of the dash too

Originally this centre housing contained centre face vents. They were discarded a long time ago for a pair of SPA gauges and Sequential shift light controler. These and the digital climate control functions will not be used so some work needed to be done.
How it once looked

Carbon plate cut to size and bonded into place


The finished article

This was once a small storage tray (on some cars this would house sunroof and cruise control functions). Tray cut away and carbon plate made

Carbon plate bonded to trim for another switch panel

Marking out for trimming of dash and marking out for dash facia panel supports. A load of remaining original tabs, mount posts etc would also ned to be removed at this stage. Once trimmed and marked out the facial panel mount strips could be added


Carbon main facia panels made up and installed into dash. These will be left "blank" until the instruments have been decided on (pretty much decided now but that's to come later on)


Old previously modified (for digi speedo/timer) tweeter housings just won't look right even with modification

Fabricated from the same 1mm alloy plate these "tweeter covers" fit better and look more like it

Thought I'd try some carbon look vinyl on the alloy to see how it looks with the rest of the dash


Dash mock up finished


So with all the cutting, trimming and mocking up of the dash done it now had to all come out again ready to get a flocked.
Flocking is a process whereby the surface of the dash gets coated in very short fibres, this helps to prevent glare and reflection in the screen. It also looks damn nice and in this case will tie all the fabricated parts in together nicely.
The Flocking was performed by South West Flocking to a very high standard.
It was then just a simple case of re-installing the dash with all it's mounts and panels.


Nice contrast between the flocked dash, carbon fibre and black plastic trims.


A very empty and roomy underside of the dash.

So that was that particular headache done and dusted....well nearly. There was still the main lower facial and sides to get done but first I had to finalise my gear shifter setup so I could trim the facia around it.
I was going to make that another separate update but I may as well continue on through as it's all kind of related anyway.
So onwards we go
Original heavy 4th gen steel shifter assembly (complete with Neuspeed short shift adapter) on extension mounts. These mounts were not quite high enough so I fabricated some alloy extension posts (2 of them in a revised position) ready for the next phase

Lighter 5th gen plastic shifter assembly installed on new taller mounts. Two of the mountings are in different positions to teh 4th gen which is why I had to make up new alloy extension posts in a revised location.
The carboard is mocking up the shifter consol that I wanted to fabricate to give a tidy clean look and to give me an area to mount items such as the Wilwood bias valve (which by now you will already seen).
Note the OEM bend in the shifter lever which takes it away from the driver, I would be straightening that out to bring the lever in closer.


Decided on a revised mount shape which is better looking and could come in useful as an additional button panel if needed.

Shifter mount cover pattern transfered over and fabricated out of 1mm alloy sheet. This doesn't actually take any of the shifter weight/force but it does tie the 4 mounting posts together under the shifter and tidies the look up

Another shot of the shifter and mount cover now with the Wilwood bias and brake lines mounted in place.

Design of 5th gen shifter differs from 4th gen which makes it hard for a short shifter adapter to be used. Although there are aftermarket short shifter kits available they are too expensive for what they are so I decided to tackle the problem my own way.

4th gen shifter cable attachment. The plan was remove this and the OEM 5th gen part. The 4th gen part would then be welded onto the 5th gen shifter in a higher position to shorten the throw of the lever between gears without the need for a "short shifter" adapter

The 5th gen shifter after I had straightened the shift lever to bring it closer to the driver and also welded the 4th gen cable mount in place. Note revised shifter cable mount position. This will also allow for further throw reduction with the use of 4th gen short shifter adapters which are as cheap as chips. Shouldn't need one though due to revised position.


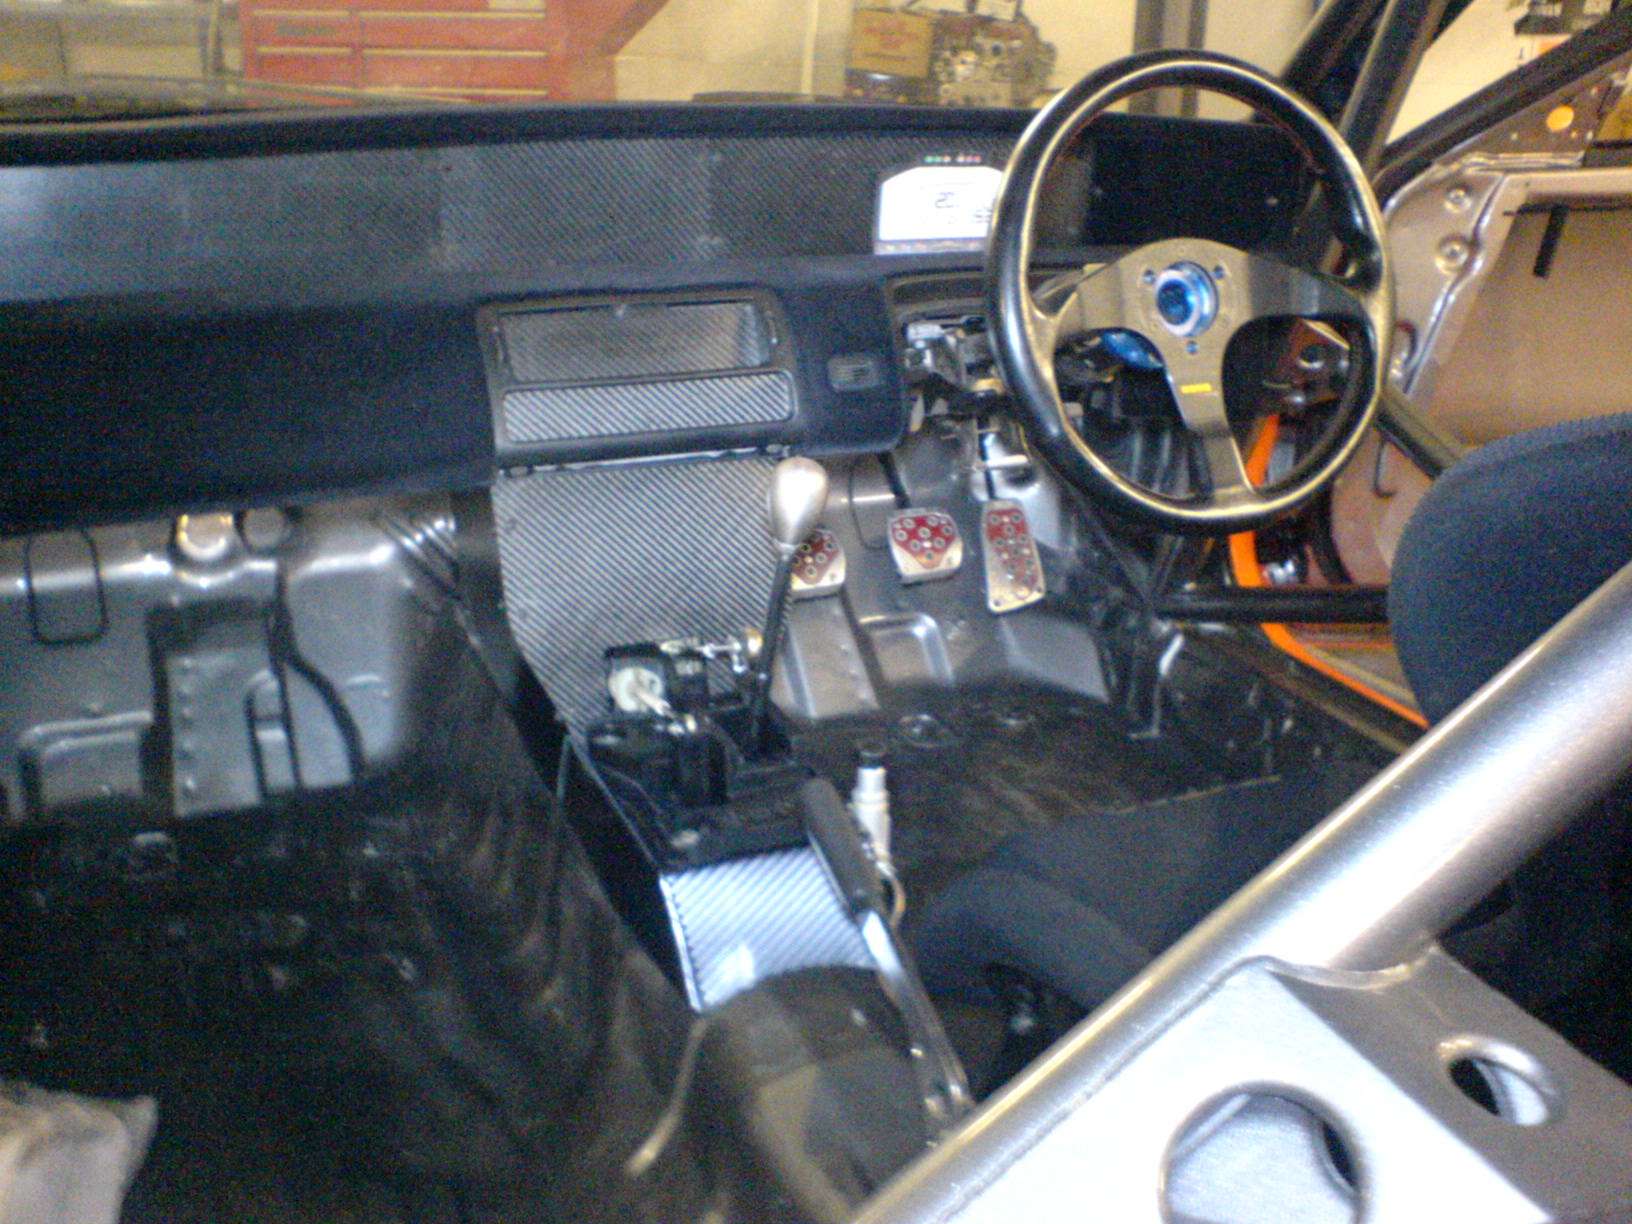
Finally after a good coat of the ol satin black to tidy things up the modified shifter was bolted back in place on top of carbon vinyl covered alloy shifter mount. Now complete with Type-R gear knob


Cables attached to check operation. Note from this shot how high and close to the steering wheel the shifter now is.

With the shifter finalised and the cables attached I could then get on with finishing off the last parts of the dash panels. Here you can see the lower facia panel and side panels trimmed around the gear shifter and mount.

Carbon side panels added to facia to enclose the whole lower dash mounting system for improved looks and protection to the systems and wiring that can be installed here - most likely the ECU will be enclosed behind here


Full dash and facias...Done - Well apart from the instruments, switches and safety systems that need to be installed. Hmmmm need to do something about those red bits in the pedals as well !!
Cheers
Rich