Congratulations to vtecmec for winning May/June's Lude Of The Month, with his DIY Turbo BB1 build.
>>> Click Here For Profile <<<

>>> Click Here For Profile <<<
1995 4G Track Car Project
-
uberNoobZA

- Posts: 430
- Joined: Mon Feb 22, 2016 2:49 pm
- My Generation: 4G
- Location: Oxford / Sanctuary / Azeroth
- Has thanked: 17 times
- Been thanked: 15 times
Re: 1995 4G Track Car Project
Cool. As I said before, I like using my sunroof, so for now it stays in. When I decide to shed weight on the old girl, I'll replace it with a custom delete .
-
uberNoobZA
- Posts: 430
- Joined: Mon Feb 22, 2016 2:49 pm
- My Generation: 4G
- Location: Oxford / Sanctuary / Azeroth
- Has thanked: 17 times
- Been thanked: 15 times
Re: 1995 4G Track Car Project
Got the Bose spare wheel sub fitted today. The job was actually easier than I thought.
I simply connected an RCA to the sub output on my head unit, and then cut the RCA plug off the other end (Bose sub does not have RCA inputs). I then connected a power cable from the same connection I used in my fusebox to hardwire my dashcams and satnav and ran this to the sub (with a separate in-line fuse). Last bit was to connect a grounding cable from a grounding point to the grounding cable on the sub.
For those that are interested - the wiring loom going into the Bose sub enclosure has 5 cables on it, and their function is as below -
- thin yellow cable is not used (as this is a mono sub and not a stereo sub)
- thin Red and Black wire is negative sub speaker input coming from head unit
- thin Brown wire is positive sub speaker input coming from head unit
- thick black wire is power ground (I connected this to the same grounding point as the 4WS ECU)
- thick Blue and Red cable is power live
-
uberNoobZA
- Posts: 430
- Joined: Mon Feb 22, 2016 2:49 pm
- My Generation: 4G
- Location: Oxford / Sanctuary / Azeroth
- Has thanked: 17 times
- Been thanked: 15 times
Re: 1995 4G Track Car Project
Been quiet for a while, as I've been away.
I'm back in UK now, and have decided that I can't afford to insure and tax 2 cars, so have SORNed the Prelude and cancelled her insurance. I'll look into getting something I can tow her with to track days / club meets.
So, now that I have a clear direction for her (a dedicated track car, and not a track car that needs to be a semi daily too), and hopefully more free time, I can get cracking on her.
After all the work I put into getting the 5G sunroof installed, I'm now taking out the entire sunroof assembly (i'll probably sell the entire assembly (glass panel, mechanism, motor, drainage pipes etc.), ready for fitting in a 4G on here, so call dibbs if you're interested). I'll also put her lowering springs back on and look into getting rid of her non functioning ABS and non functioning aircon. Then it will be onto the 2WS conversion
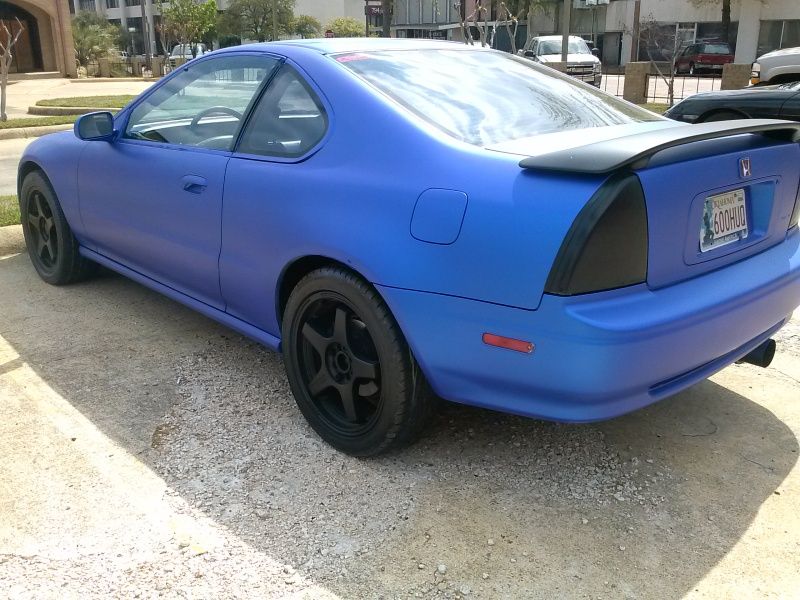
Oh, and I'm also thinking of plastidipping her in this colour (wheels and taillights will stay as they are, spoiler will be blue as well) -
I'm back in UK now, and have decided that I can't afford to insure and tax 2 cars, so have SORNed the Prelude and cancelled her insurance. I'll look into getting something I can tow her with to track days / club meets.
So, now that I have a clear direction for her (a dedicated track car, and not a track car that needs to be a semi daily too), and hopefully more free time, I can get cracking on her.
After all the work I put into getting the 5G sunroof installed, I'm now taking out the entire sunroof assembly (i'll probably sell the entire assembly (glass panel, mechanism, motor, drainage pipes etc.), ready for fitting in a 4G on here, so call dibbs if you're interested). I'll also put her lowering springs back on and look into getting rid of her non functioning ABS and non functioning aircon. Then it will be onto the 2WS conversion
Oh, and I'm also thinking of plastidipping her in this colour (wheels and taillights will stay as they are, spoiler will be blue as well) -
-
uberNoobZA
- Posts: 430
- Joined: Mon Feb 22, 2016 2:49 pm
- My Generation: 4G
- Location: Oxford / Sanctuary / Azeroth
- Has thanked: 17 times
- Been thanked: 15 times
Re: 1995 4G Track Car Project
Removed entire sunroof assembly (including drainage pipes), ready for the blanking plate to be installed.


And here the mechanism is, all assembled again. I also have he sunroof wind deflector (just needs new mounting tape/glue applied), which is not shown.

This is the entire sunroof mechanism from a 4G, with the sunroof panel replaced with the glass panel from a 5G.
And here the mechanism is, all assembled again. I also have he sunroof wind deflector (just needs new mounting tape/glue applied), which is not shown.
This is the entire sunroof mechanism from a 4G, with the sunroof panel replaced with the glass panel from a 5G.


-
uberNoobZA
- Posts: 430
- Joined: Mon Feb 22, 2016 2:49 pm
- My Generation: 4G
- Location: Oxford / Sanctuary / Azeroth
- Has thanked: 17 times
- Been thanked: 15 times
Re: 1995 4G Track Car Project
Laugh if you will, but drilling so many holes in the old girl was one of the most uncomfortable things I've had to do for a long time. Still being a novice at this, I'll always expecting myself to totally both it up (I did break off 2 drill bits after all).
Anyway, holes (except for 2, as I need new bits) are drilled and the panel is (mostly) rivetted to place. Before putting it in place on top of the car, I ran some silicone sealant along the bottom edge of the panel, which seems to have worked pretty well. I'll also be running some sealant along the inside of the panel, just to be sure. once I plastidip the car, it's all going to be covered in plastidip anyway, so it should be pretty mush watertight :Smile:
Couple of exterior shots


And interior shots


Assuming the heat subsides a little, this weekend I will probably go through and seal the inside of the panel, and also do some painting of the panel, as well as areas that were previously covered by the sunroof assembly (so were not painted black earlier). I also need to refit the interior light and LEDs.
Anyway, holes (except for 2, as I need new bits) are drilled and the panel is (mostly) rivetted to place. Before putting it in place on top of the car, I ran some silicone sealant along the bottom edge of the panel, which seems to have worked pretty well. I'll also be running some sealant along the inside of the panel, just to be sure. once I plastidip the car, it's all going to be covered in plastidip anyway, so it should be pretty mush watertight :Smile:
Couple of exterior shots
And interior shots
Assuming the heat subsides a little, this weekend I will probably go through and seal the inside of the panel, and also do some painting of the panel, as well as areas that were previously covered by the sunroof assembly (so were not painted black earlier). I also need to refit the interior light and LEDs.
-
NafemanNathan
- LotM Winner
- Posts: 20144
- Joined: Sun Aug 08, 2010 9:37 pm
- My Generation: 0G
- Location: Yeovil, Somerset
- Has thanked: 8 times
- Been thanked: 124 times
When you siliconed the underside of the panel before attaching it, which side of the holes did you put the sealant on, inside ring of holes or outside the ring of holes? If inside the ring of holes I'd also suggest siliconing around the outside of the panel topside. Otherwise you will unfortunately get water under the panel and it will reach the rivet holes and get under your skin quite literally 

-
uberNoobZA
- Posts: 430
- Joined: Mon Feb 22, 2016 2:49 pm
- My Generation: 4G
- Location: Oxford / Sanctuary / Azeroth
- Has thanked: 17 times
- Been thanked: 15 times
Re: 1995 4G Track Car Project
i put the silicone over the holes (mostly), so that it actually squished up through the pre drilled holes in the panel when I placed it on the roof of the car and drilled through into the roof. Good point though, and yeah, I was going to run a small bead of silicone all the way around the outside of the panel, especially because in between the rivets, the panel does not always sit completely flush. i suppose I COULD just drill more holes and rivet even more, but seems over kill 
Another reason I wanted to put silicone on the outside of the panel is so that when it comes time to plastidipping, the plastidip covers it properly, without having small gaps between plastidip on the panel and plastidip on the roof.
Another reason I wanted to put silicone on the outside of the panel is so that when it comes time to plastidipping, the plastidip covers it properly, without having small gaps between plastidip on the panel and plastidip on the roof.
-
NafemanNathan
- LotM Winner
- Posts: 20144
- Joined: Sun Aug 08, 2010 9:37 pm
- My Generation: 0G
- Location: Yeovil, Somerset
- Has thanked: 8 times
- Been thanked: 124 times