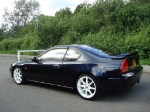
Congratulations to vtecmec for winning May/June's Lude Of The Month, with his DIY Turbo BB1 build.

>>> Click Here For Profile <<<

Image

Front upper arm ball joint removal

Chassis/Brakes/Steering/Wheels discussion
Post Reply
User avatar
rick82
Posts: 50
Joined: Mon Jan 21, 2013 8:05 pm
My Generation: 4G

Front upper arm ball joint removal

Post by rick82 » Fri Mar 28, 2014 1:28 pm

Do the standard ones just press out? i have had a look and they look like they are part of the control arm themselves?

Thanks
RIP S14
RIP 4th Gen
Hello 4th Gen

User avatar
Merlin
Moderator
Posts: 12394
Joined: Fri Aug 06, 2010 9:04 am
My Generation: 5G
PSN GamerTag: Merlinbadman
Location: Edinburgh
Has thanked: 70 times
Been thanked: 304 times

Post by Merlin » Fri Mar 28, 2014 1:31 pm

Take off the circlip on the bottom (easier with a pair of circlip pliers) and them hammer it out (leave the old nut on the end to give a larger contact area). Take the rubber boot off the new ball joint, hammer in the new ball joint, put the boot back on, and try not to rip the boot when putting the circlip on ;)

Afterwards double check that the balljoint does not rattle up and down. There should be no movement at all and the circlip should be sitting flush with the bottom of the arm.
Image
BA8......... BB4......... BB8.........The JDM Muscle Bus

Online
User avatar
Vtecmec
LotM Winner
Posts: 5491
Joined: Fri Aug 06, 2010 5:43 pm
My Generation: 4G
XBOX GamerTag: vtecmec
Location: East Midlands
Has thanked: 149 times
Been thanked: 441 times

Post by Vtecmec » Fri Mar 28, 2014 1:40 pm

As above, though use a socket like a press adapter on the new one so you don't deform it while fitting. And pay attention to the alignment, the're designed to sit in line with two little alignment marks.

User avatar
rick82
Posts: 50
Joined: Mon Jan 21, 2013 8:05 pm
My Generation: 4G

Post by rick82 » Fri Mar 28, 2014 1:55 pm

Thanks.

Everywhere i phoned said they can't get the bush and they could only supply the whole arm. I have found some online though, just the standard one looked pretty moulded in there.
RIP S14
RIP 4th Gen
Hello 4th Gen

Online
User avatar
Vtecmec
LotM Winner
Posts: 5491
Joined: Fri Aug 06, 2010 5:43 pm
My Generation: 4G
XBOX GamerTag: vtecmec
Location: East Midlands
Has thanked: 149 times
Been thanked: 441 times

Post by Vtecmec » Fri Mar 28, 2014 1:58 pm

Somewhere in the link in my signature, I have pics of when I installed mine.......

gordonlear
LotM Winner
Posts: 370
Joined: Wed Mar 09, 2011 7:22 pm
My Generation: 5G
PSN GamerTag: gordielear
Location: Frome, Somerset

Post by gordonlear » Mon Mar 02, 2015 9:09 pm

Is this the same procedure on the 5th gens? I need a to replace the top and bottom ones.
Image

User avatar
Merlin
Moderator
Posts: 12394
Joined: Fri Aug 06, 2010 9:04 am
My Generation: 5G
PSN GamerTag: Merlinbadman
Location: Edinburgh
Has thanked: 70 times
Been thanked: 304 times

Post by Merlin » Tue Mar 03, 2015 8:58 am

Yup ;)
Image
BA8......... BB4......... BB8.........The JDM Muscle Bus

Darkam
Posts: 240
Joined: Sat Sep 28, 2013 2:13 pm
My Generation: 5G

Post by Darkam » Wed Mar 04, 2015 1:57 pm

No circlips on mine and as said it looks molded to it, hammering it have not done anything to it... Will try a kind of press tool.

User avatar
Merlin
Moderator
Posts: 12394
Joined: Fri Aug 06, 2010 9:04 am
My Generation: 5G
PSN GamerTag: Merlinbadman
Location: Edinburgh
Has thanked: 70 times
Been thanked: 304 times

Post by Merlin » Wed Mar 04, 2015 2:15 pm

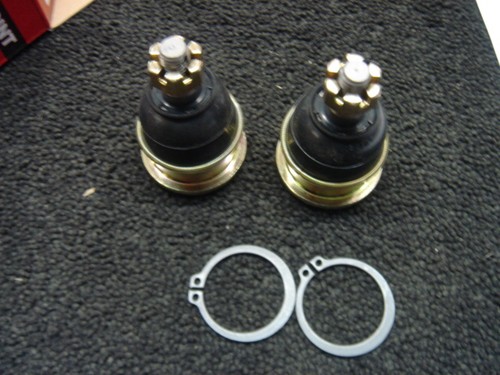
There should be a circlip on it (although I have never done it to a 5th gen), it is on the underneath, the side with the threaded "bolt". Take a pic if you are unsure.


Should look like these (5th gen ones on Ebay)

Image

http://www.ebay.co.uk/itm/HONDA-PRELUDE ... 4d01aeeac9
Image
BA8......... BB4......... BB8.........The JDM Muscle Bus

Post Reply

Return to “Chassis / Brakes / Steering / Wheels”