Congratulations to vtecmec for winning May/June's Lude Of The Month, with his DIY Turbo BB1 build.
>>> Click Here For Profile <<<

>>> Click Here For Profile <<<
Duo's 4th Gen's
Duo's 4th Gen's
Ok so for my first post I'm going to say the next few posts will be copied from another forum so some bits may not make sense but the important bits will, then after that it'll be new stuff and make actual sense, so enjoy the read guys and gals 
Re: Duo's 4th Gen's
Well I've finally gotten off my lazy ass and decided to get the pictures off my phone and load them up to photobucket. The car is a 4th gen BB3 Prelude UKDM 2.0i, planned mods, yeah a few including brakes and suspension etc but nothing major yet as like most cash is forever short Laughing Anyway onto the pics
My pride and joy, cleaned and PUK stickered.

The old rad, got the new one from adrad.co.uk

New rad in the car

My engine bay, could be cleaner but not too bad, can see the megnecor leads and high temp paint on the heat shield.

Finally for now, something done today, metalic high temp paint followed by a couple of coats of clear protection.

The phones camera struggled to capture the metalic look and they look lumpy Laughing they are very smooth and back on the car dry and nice looking. Thats it for now but as things get done I'll take pics and post them here or in relevant topics.
Chris
My pride and joy, cleaned and PUK stickered.
The old rad, got the new one from adrad.co.uk
New rad in the car
My engine bay, could be cleaner but not too bad, can see the megnecor leads and high temp paint on the heat shield.
Finally for now, something done today, metalic high temp paint followed by a couple of coats of clear protection.
The phones camera struggled to capture the metalic look and they look lumpy Laughing they are very smooth and back on the car dry and nice looking. Thats it for now but as things get done I'll take pics and post them here or in relevant topics.
Chris
Re: Duo's 4th Gen's
Presents from the delivery types, cheers to scort as the calipers are ace.
Some pimpin' disks.

Pimpin' pads to go with the disks.

High quality rubber (ooer missus ont that kind!!!! you cheeky sort)

Decided to go for the Black Diamond 'Combi' disks because i wanted drilled and grooved (I like the look) on both front and rear, the pads are Black Diamonds own Predator pads and the refurb kits are all the rubber bits you need to make calipers good as new.

One of the calipers.
These are quite easy to take apart with the exception of getting the pot out, that was done with a bit of metal trough the brake line hole and a few taps with a hammer (careful not to damage the pot here). If you are going to attempt this I recommend having exact fit sockets (hexagonal tyes) as these do not round off nuts that are stiff.
The front calipers took some work with a drill powered wire brush to get all of the rust and other things off ready for solvent bath before painting. The pots, bolts, bleed nipples and metal retainers/sliders/springs come up really well using a softer brush. I used a rotary brass brush again in a drill, got everything shiny and nice.
Unfortunately no pics of the rears as I got a bit into it and forgot Embarassed but the principles are the same. However when detaching the handbrake cable the little stud holding it to the arm on the caliper has a slot (presumably for a screwdriver but it does not unscrew. The split pin just comes out and it takes some persuasion but the retaining pin slides out.

After a clean and bath in some petrol in one of mums old roasting tins we have shiny metal.
Remember to mask off important bits BEFORE spraying/painting the calipers lol. Don't want to have to clean paint off screw threads etc thats just more work.

Painted up nicely with the VHT paint.
Everything is clean and ready to go back together, again I got into the assembly and forgot to do pics (I know poor excuse Laughing ).
My biggest tip for this part of the proceedings is regarding putting the rubber in with the piston. The inner seal can be located and thats it, the outer seal will not stay in place while the pot goes in!!! Grease up the pot and slide the outer rubber over it and push it up until it locates in the groove in the top of the pot. Then pull the seal down and out of the groove, this gives you a 5mm or so leeway, keep sliding the seal down until there is only the top 5mm left on the pot and the rest is hanging down from the bottom.
Now the tricky bit, holding the pot place it in line then tilt towards the back of the caliper slightly. While it's like this you can easily push the front of the seal into place, now when you push the piston in (screw it in for rears) the pot will push the seal into place. This was the easiest way I found after about 30 mins of getting angry Laughing

All done, 11pm sat night and covered in black dust but red brakes Very Happy
Sat was a 13 hour day just working on the calipers, tired but feeling acomplished. Certainly took longer than I thought. Bolting everything to the car took a lot less time and was far easier and everything was thouroughly bled as the fluid was black. Nice new fluid now.

First rear on, looking good.

First front, mmmmmm.

Nice!

Wheels need cleaning again.
Copper grease is your friend for a job like this and blue (medium) stud lock on important bits we don't want undone. All the bleed nipples have copper grease on the threads to try and stop them rusting in. If anyone wants to try or is trying this just remember it takes a lot of time but fairly easy from a technical standpoint. If you want help/advice just pm and I'll see if I can help, really is worth it for the "I did that"/"job well done" feeling
Update for the future, this is why the pics off Confused will help as the caliper assemble process is in much detail in the pics
Some pimpin' disks.
Pimpin' pads to go with the disks.
High quality rubber (ooer missus ont that kind!!!! you cheeky sort)
Decided to go for the Black Diamond 'Combi' disks because i wanted drilled and grooved (I like the look) on both front and rear, the pads are Black Diamonds own Predator pads and the refurb kits are all the rubber bits you need to make calipers good as new.
One of the calipers.
These are quite easy to take apart with the exception of getting the pot out, that was done with a bit of metal trough the brake line hole and a few taps with a hammer (careful not to damage the pot here). If you are going to attempt this I recommend having exact fit sockets (hexagonal tyes) as these do not round off nuts that are stiff.
The front calipers took some work with a drill powered wire brush to get all of the rust and other things off ready for solvent bath before painting. The pots, bolts, bleed nipples and metal retainers/sliders/springs come up really well using a softer brush. I used a rotary brass brush again in a drill, got everything shiny and nice.
Unfortunately no pics of the rears as I got a bit into it and forgot Embarassed but the principles are the same. However when detaching the handbrake cable the little stud holding it to the arm on the caliper has a slot (presumably for a screwdriver but it does not unscrew. The split pin just comes out and it takes some persuasion but the retaining pin slides out.
After a clean and bath in some petrol in one of mums old roasting tins we have shiny metal.
Remember to mask off important bits BEFORE spraying/painting the calipers lol. Don't want to have to clean paint off screw threads etc thats just more work.
Painted up nicely with the VHT paint.
Everything is clean and ready to go back together, again I got into the assembly and forgot to do pics (I know poor excuse Laughing ).
My biggest tip for this part of the proceedings is regarding putting the rubber in with the piston. The inner seal can be located and thats it, the outer seal will not stay in place while the pot goes in!!! Grease up the pot and slide the outer rubber over it and push it up until it locates in the groove in the top of the pot. Then pull the seal down and out of the groove, this gives you a 5mm or so leeway, keep sliding the seal down until there is only the top 5mm left on the pot and the rest is hanging down from the bottom.
Now the tricky bit, holding the pot place it in line then tilt towards the back of the caliper slightly. While it's like this you can easily push the front of the seal into place, now when you push the piston in (screw it in for rears) the pot will push the seal into place. This was the easiest way I found after about 30 mins of getting angry Laughing
All done, 11pm sat night and covered in black dust but red brakes Very Happy
Sat was a 13 hour day just working on the calipers, tired but feeling acomplished. Certainly took longer than I thought. Bolting everything to the car took a lot less time and was far easier and everything was thouroughly bled as the fluid was black. Nice new fluid now.
First rear on, looking good.
First front, mmmmmm.
Nice!
Wheels need cleaning again.
Copper grease is your friend for a job like this and blue (medium) stud lock on important bits we don't want undone. All the bleed nipples have copper grease on the threads to try and stop them rusting in. If anyone wants to try or is trying this just remember it takes a lot of time but fairly easy from a technical standpoint. If you want help/advice just pm and I'll see if I can help, really is worth it for the "I did that"/"job well done" feeling
Update for the future, this is why the pics off Confused will help as the caliper assemble process is in much detail in the pics
Last edited by Duo on Sun Jan 29, 2012 12:09 pm, edited 1 time in total.
Re: Duo's 4th Gen's
Been a little while but as a bit of an update I will be getting a brake light spoiler and folding JDM mirrors and the kit. I'll be sure to take more pics and document everything for the mirror convert as it seems to be one of thos tricky jobs in places. I also wanted the JDM style puddle lights and decided to make my own as it's not too hard. After looking at how to get the wires into the door I gave up as it was late Sunday afternoon and went with a different location that was far easier.

These are door specific too so only the drivers side light up with the drivers door and passenger side lights up with only the passenger door. I've also swapped the boot light and interior light for blue LED's and will try to do some pics soon. I'll be sure to post pics and info once I've paid for and got the bits
These are door specific too so only the drivers side light up with the drivers door and passenger side lights up with only the passenger door. I've also swapped the boot light and interior light for blue LED's and will try to do some pics soon. I'll be sure to post pics and info once I've paid for and got the bits
Last edited by Duo on Sun Jan 29, 2012 12:10 pm, edited 1 time in total.
Re: Duo's 4th Gen's
Just a quick update, Scarlet got her wheels cleaned up!! I'm going to stress one thing, I did not prep between coats of paint or laquer nor did I filler kerb damage cos it's hard work and I'm really lazy Laughing so the finish is a little less than smooth but from any kind of distance you can't tell and the improvment is great. Here are some pics.

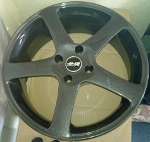
Not a great wheel, needed the most work.

One of the other 3, mostly the same so not bad to start with, sanded down already.

Remember that bad one, lots of material had to be removed.

One of the smoother ones in primer.

The badly kerbed, bubbling one in primer, looking better.

The fronts finished in silver with laquer.

The bad one finished off, BIG improvement.

Pimped centre caps y0!

Pimpin' wheel nuts too, they were rusty, lots of acrylic laquer on these, about 4 good coats.
More updates and of course piccies as I get them done, hopefully getting some nice goodies and the rear arches done soon. Not cheap but she's worth it Wink
Not a great wheel, needed the most work.
One of the other 3, mostly the same so not bad to start with, sanded down already.
Remember that bad one, lots of material had to be removed.
One of the smoother ones in primer.
The badly kerbed, bubbling one in primer, looking better.
The fronts finished in silver with laquer.
The bad one finished off, BIG improvement.
Pimped centre caps y0!
Pimpin' wheel nuts too, they were rusty, lots of acrylic laquer on these, about 4 good coats.
More updates and of course piccies as I get them done, hopefully getting some nice goodies and the rear arches done soon. Not cheap but she's worth it Wink
Last edited by Duo on Sun Jan 29, 2012 12:12 pm, edited 1 time in total.
Re: Duo's 4th Gen's
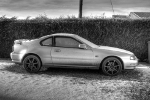
Got a new 'lude!
Well it's been a while and after a hole appeared in the rad things went on hold but I've been busy of a weekend and evening and now have everything done for the time being.

Few bits to go onto the car.

Unfortunately we got a bit involved so no inbetween pics but the end result is nice. Thats Halfords metallic VHT paint and Honda Supersonic Blue (again from Halfords) and everything is running nicely Cool

Entirely cleaned by hand including polish and extra gloss protection, takes a long time by hand but worth it.

The manditory reflection shot.
Not bad in all, the belts all look good so they've dropped down the list but I noticed my front passenger shock is screwed after dropping all it's oil so when I finally get my bonus some nice Tein Super Streets will be on the way Smile
Well it's been a while and after a hole appeared in the rad things went on hold but I've been busy of a weekend and evening and now have everything done for the time being.
Few bits to go onto the car.
Unfortunately we got a bit involved so no inbetween pics but the end result is nice. Thats Halfords metallic VHT paint and Honda Supersonic Blue (again from Halfords) and everything is running nicely Cool
Entirely cleaned by hand including polish and extra gloss protection, takes a long time by hand but worth it.
The manditory reflection shot.
Not bad in all, the belts all look good so they've dropped down the list but I noticed my front passenger shock is screwed after dropping all it's oil so when I finally get my bonus some nice Tein Super Streets will be on the way Smile
Last edited by Duo on Sun Jan 29, 2012 12:13 pm, edited 1 time in total.
Re: Duo's 4th Gen's
Ammo I'm just copying for now, was gonna do the img code after, just quicker to get things into LG then do the tweaks after, of course if you want to I'm not going to complain!!!!!! lmao

For reference this is after my centre console is removed, you can see the blue service connector location Cool

Got the bumper of to do the fogs.

Here's the puppies, you can see the brackets are rusted a lot so I'm going to de rust and probably gun blue to try and make a harder surface finish.

Close up, the rust is really bad on this one.

The O2 sensor was a pain to get out, eventually removed the downpipe and cat to do it so fitted the de-cat while it was off.

Tein Superstreet's are aewsome and really sharpen up handling.

Here's a pic of my gearbox (the oil was from a leaking cam end seal or rocker cover or vtec solenoid lol) The shiny drain plug is a spoon magnetic item.

Cat and you can see the sensor on here but the wire is removed and grounded anyway, the bolts were quite rusty, no heat shield either.

VTEC solenoid and Skunk2 cam end seal behind it. Replaced the end seal, solenoid filter and seal and the rocker cover seal, the oil has stopped!! Hooray!!!

My tarted up rocker cover
For reference this is after my centre console is removed, you can see the blue service connector location Cool
Got the bumper of to do the fogs.
Here's the puppies, you can see the brackets are rusted a lot so I'm going to de rust and probably gun blue to try and make a harder surface finish.
Close up, the rust is really bad on this one.
The O2 sensor was a pain to get out, eventually removed the downpipe and cat to do it so fitted the de-cat while it was off.
Tein Superstreet's are aewsome and really sharpen up handling.
Here's a pic of my gearbox (the oil was from a leaking cam end seal or rocker cover or vtec solenoid lol) The shiny drain plug is a spoon magnetic item.
Cat and you can see the sensor on here but the wire is removed and grounded anyway, the bolts were quite rusty, no heat shield either.
VTEC solenoid and Skunk2 cam end seal behind it. Replaced the end seal, solenoid filter and seal and the rocker cover seal, the oil has stopped!! Hooray!!!
My tarted up rocker cover
Last edited by Duo on Sun Jan 29, 2012 12:15 pm, edited 1 time in total.
Re: Duo's 4th Gen's
Well my front JDM yellow fogs are now refurbushed somewhat and got the carbon covers to go on them too Very Happy I know the new paint on the brakets is a bit off too, I dropped them Embarassed Laughing and now some piccies:


And for now thats it folks, will try to do a few pics in the near future and add some info and such but the main bulk of the info is copied over
And for now thats it folks, will try to do a few pics in the near future and add some info and such but the main bulk of the info is copied over
Last edited by Duo on Sun Jan 29, 2012 12:15 pm, edited 1 time in total.