Congratulations to vtecmec for winning May/June's Lude Of The Month, with his DIY Turbo BB1 build.
>>> Click Here For Profile <<<

>>> Click Here For Profile <<<
Nitin's SiR Type-S - Last update ever :(
-
honda-hardy

- Club Cartographer
- Posts: 6268
- Joined: Sat Jan 28, 2012 7:35 pm
- My Generation: 5G
- Location: chippenham
- Been thanked: 1 time

-
nitin_s1

- Posts: 10500
- Joined: Tue Aug 03, 2010 1:09 pm
- My Generation: 5G
- PSN GamerTag: N171N
- Location: London
- Has thanked: 148 times
- Been thanked: 135 times
- Contact:


-
nitin_s1
- Posts: 10500
- Joined: Tue Aug 03, 2010 1:09 pm
- My Generation: 5G
- PSN GamerTag: N171N
- Location: London
- Has thanked: 148 times
- Been thanked: 135 times
- Contact:
Re: Nitin's SiR Type-S
Time for an update:
Whilst the car was off road and didn't drive it for a long time and with a wet winter my car had developed a water leak.. I had a slight water leak coming from the Midwing spoiler holes which I knew and wasn't a big problem as it only collected very little water.. But I think the rear washer or the guttering at the back has been collecting lot of water in the roof lining and whilst driving the water came out from A/B/C pillars..
  It's only a small amount of water but still some to get me upset.
  Now will have to rip out the roof lining, all the trim pieces and see where it is coming from and sort it out..
I went off to Sam's place to drop off the Bonnet spoiler and to get my ATR brake discs/pads fitted..


Looks well cool, massive and chunky..
Dual pistons ATR callipers with 300mm discs up front.. Looks well chunky/Massive/cool just like my ....
Pictures for the reference.


Also the car now has Motegi sides. Didn't take any pictures but will do on the weekend..
Whilst the car was off road and didn't drive it for a long time and with a wet winter my car had developed a water leak..
I went off to Sam's place to drop off the Bonnet spoiler and to get my ATR brake discs/pads fitted..
Looks well cool, massive and chunky..
Dual pistons ATR callipers with 300mm discs up front.. Looks well chunky/Massive/cool just like my ....
Pictures for the reference.
Also the car now has Motegi sides. Didn't take any pictures but will do on the weekend..

-
honda-hardy
- Club Cartographer
- Posts: 6268
- Joined: Sat Jan 28, 2012 7:35 pm
- My Generation: 5G
- Location: chippenham
- Been thanked: 1 time

-
nitin_s1
- Posts: 10500
- Joined: Tue Aug 03, 2010 1:09 pm
- My Generation: 5G
- PSN GamerTag: N171N
- Location: London
- Has thanked: 148 times
- Been thanked: 135 times
- Contact:
Re: Nitin's SiR Type-S
I need to get some better pictures.. The dirty filthy wheels don't help.. 

+Rep to Sam/HH..
+Rep to Sam/HH..
-
nitin_s1
- Posts: 10500
- Joined: Tue Aug 03, 2010 1:09 pm
- My Generation: 5G
- PSN GamerTag: N171N
- Location: London
- Has thanked: 148 times
- Been thanked: 135 times
- Contact:
Re: Nitin's SiR Type-S
Time for a small update..
I wanted my car to look half decent at South Mimms meet which is coming up at the end of the month so got sorting out the small visual issues on the car.
Firstly, I removed the scuttle panel which was looking really dull/grey and made the whole engine bay look outdated. Took that out to spay it black. At the same time I sprayed the battery tie down bar and also the vipers. Sorry didn't take a picture of the things before I sprayed them but you know how it would look in grey. So pictures of them during their spray session and after..


And after the panel fitted back. [while the panel was off the car, I cleaned the under the area which it was covering. Treated some surface rust with Krust and took out all the gunk/leaves etc]

Next on the list was the window rubber seals.
Cleaned with rough bit of the sponge with ordinary car washing shampoo, dried off, masked off the car and sprayed with black bumper spray [can bought from Halfords]


At the same time I did the window rubber seals I did the roof trim pieces too.. I'm not sure what the previous owner(s) have done but one of the piece was covered in some sort of bathroom sealant. That was an absolute pain the arse to take off and it got stuck on everything that it touched. Still keep calm and carry on.. Got rid of that and re-sprayed and put back together and also cleaned the area that it was covering.


Haven't got pictures of the finished product. I will clean the car and try to do a mini detail and then take picture. But just by doing these little things the car looks really great.
Next on the list was the front bumper. As you know one guy in a Ford reversed into me and this gave the front bumper a small dent and a huge scuff mark, this made the car look really bad. While I was taking off the bumper, I managed to break the connectors for the fog lights (both them) so just waiting for some new connectors to come and that will all go back together.
While the bumper was off the car, I took this time to take out the resonator box and also cleaned up any surface rust and dirt.

Old bumper with Type-S lip (Yes we had dinner in the garden as Prelude took priority over dining table  )
)

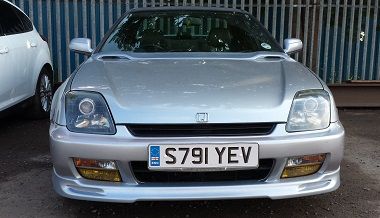
Bumper with JDM lip (sorry about this over exposed pic but that was the only one I had on the iPhone). My 'Type-S' front grill badge was also chipped so replaced it with 'Prelude' badge. You can see it in the picture.

As I was waiting for the new fog light connectors to turn up via eBay, I had been looking at the headlights One was perfect but the other one had some sort of white fog from underneath the lens.. Not sure how that happened but it was like this when I got it. So I thought let me take them out the car while everything is off and just open them up. If I can't get them back together then Cebul was going to offer me his better condition headlight lens (thanks mate).
It was really easy to open them up and I don't know why I didn't do this earlier. Oven on 200 degrees for 10 minutes and then turn it off, then put the headlight in the oven on top of a cloth, close the oven door, leave in there for 7 minutes and take them out. The just open them up with flat head screw driver.. There are lots of pictures on the internet and Ratty was also helping via texts just incase I got stuck with something. Pictures of the progress.

Spraying them up and closing them up. (closing them up was the same procedure: heat in the oven to soften the sealant)


H1 bulbs and LED Side light replacement:
I replaced the H1 bulbs as some of them broke while I was pulling too hard and I replaced the side lights for some LED bulbs. For reference the bulb for the side lights is 501. Sorry no pictures of the complete products but I will take lots when everything is back on and the car is cleaned.
New JDM Number plate:
The old number plate was too big and also had lots of chips so ordered a new one from Demon Plates. The new size is a bit smaller then this so should look good. [330mm x 152mm].
Just waiting for the fog light connectors to come through now so I can fit them and drop the car off at the body shop to get the front bumper/lip re-sprayed. Then I can detail the car and looking a bit better for the South Mimms show.
I wanted my car to look half decent at South Mimms meet which is coming up at the end of the month so got sorting out the small visual issues on the car.
Firstly, I removed the scuttle panel which was looking really dull/grey and made the whole engine bay look outdated. Took that out to spay it black. At the same time I sprayed the battery tie down bar and also the vipers. Sorry didn't take a picture of the things before I sprayed them but you know how it would look in grey. So pictures of them during their spray session and after..
And after the panel fitted back. [while the panel was off the car, I cleaned the under the area which it was covering. Treated some surface rust with Krust and took out all the gunk/leaves etc]
Next on the list was the window rubber seals.
Cleaned with rough bit of the sponge with ordinary car washing shampoo, dried off, masked off the car and sprayed with black bumper spray [can bought from Halfords]
At the same time I did the window rubber seals I did the roof trim pieces too.. I'm not sure what the previous owner(s) have done but one of the piece was covered in some sort of bathroom sealant. That was an absolute pain the arse to take off and it got stuck on everything that it touched. Still keep calm and carry on.. Got rid of that and re-sprayed and put back together and also cleaned the area that it was covering.
Haven't got pictures of the finished product. I will clean the car and try to do a mini detail and then take picture. But just by doing these little things the car looks really great.
Next on the list was the front bumper. As you know one guy in a Ford reversed into me and this gave the front bumper a small dent and a huge scuff mark, this made the car look really bad. While I was taking off the bumper, I managed to break the connectors for the fog lights (both them) so just waiting for some new connectors to come and that will all go back together.
While the bumper was off the car, I took this time to take out the resonator box and also cleaned up any surface rust and dirt.
Old bumper with Type-S lip
Bumper with JDM lip (sorry about this over exposed pic but that was the only one I had on the iPhone). My 'Type-S' front grill badge was also chipped so replaced it with 'Prelude' badge. You can see it in the picture.
As I was waiting for the new fog light connectors to turn up via eBay, I had been looking at the headlights
It was really easy to open them up and I don't know why I didn't do this earlier. Oven on 200 degrees for 10 minutes and then turn it off, then put the headlight in the oven on top of a cloth, close the oven door, leave in there for 7 minutes and take them out. The just open them up with flat head screw driver.. There are lots of pictures on the internet and Ratty was also helping via texts just incase I got stuck with something. Pictures of the progress.
Spraying them up and closing them up. (closing them up was the same procedure: heat in the oven to soften the sealant)
H1 bulbs and LED Side light replacement:
I replaced the H1 bulbs as some of them broke while I was pulling too hard and I replaced the side lights for some LED bulbs. For reference the bulb for the side lights is 501. Sorry no pictures of the complete products but I will take lots when everything is back on and the car is cleaned.
New JDM Number plate:
The old number plate was too big and also had lots of chips so ordered a new one from Demon Plates. The new size is a bit smaller then this so should look good. [330mm x 152mm].
Just waiting for the fog light connectors to come through now so I can fit them and drop the car off at the body shop to get the front bumper/lip re-sprayed. Then I can detail the car and looking a bit better for the South Mimms show.