
Congratulations to vtecmec for winning May/June's Lude Of The Month, with his DIY Turbo BB1 build.
>>> Click Here For Profile <<<

>>> Click Here For Profile <<<
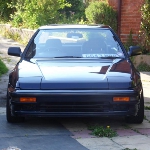
Vtecmec's 4th Gen


-
NafemanNathan
- LotM Winner
- Posts: 20144
- Joined: Sun Aug 08, 2010 9:37 pm
- My Generation: 0G
- Location: Yeovil, Somerset
- Has thanked: 8 times
- Been thanked: 124 times


-
paul bristol uk

- Moderator
- Posts: 1896
- Joined: Wed Aug 04, 2010 11:51 pm
- My Generation: 4G
- Location: In a world of my own
-
Vtecmec
- LotM Winner
- Posts: 5496
- Joined: Fri Aug 06, 2010 5:43 pm
- My Generation: 4G
- XBOX GamerTag: vtecmec
- Location: East Midlands
- Has thanked: 152 times
- Been thanked: 442 times
Rear end painting
Thanks guys.
Right, so I’ve been rather busy on this recently as some of you know, and have made some good progress……….
Firstly was the final bit mechanically, which was the alternator, after running the car the battery light is still on, and coupled with the fact that I had somehow bent the shaft on it whilst stripping and rebuilding it, you could see the pulley wobbling like mad when running, I’ve just replaced it with a known working one curtesy of Wurlycorner, which I collected from him whilst he was procuring a French boat not too far from my place.
Removing the existing pulley proved rather difficult, I tried a multitude of different approaches, before finally ending up at pure brute force.

Once the pulley was swapped, I popped in the new voltage regulator I had bought, painted it black (as I had run out of silver paint at this point) and popped the nicely polished little cover on.
So that was that, now onto the (basic) music. I fiddled with the headunit that had been sat in the car for the last 5 years, plugged it in and it lit up straight away, great. But then I attempted to load a CD and it just grumbled for a bit and spat it out again. Having spent more money than I’ve already planned to over the last few months, I went onto the bay and picked up the cheapest unit I could just so I had something. £14 later I was the proud owner of some random brand unit, though it does have 2 pre-outs as well as SD card and USB malarkey, which is probably a good thing as the glove box can probably hold 1 CD maximum (I’d forgotten how useless it was).

After swapping the units over, I thought I’d crack open the other unit to see what was its problem, typically about half an hour later I had found the issue and it was functional again.
I dug out some spare door trims that I bought a fair while back (so long ago they had my old, old address still on the packaging), and swapped them for the rather rough ones that were on the car.

At the same time, I took some time out to do a bit of maintenance to the stuff in the doors, with a good chance of stuff seizing through not being used for so long, I greased the window motors, runners and guides, as well as the check straps and door locking mechanisms. All the windows and locks now operate quite nicely.
I’ve also fitted some facelift tweeter covers in the dash.
So, onto the bodywork. I obtained a new rear bumper and rear euro lip at the national meet from W1ggs. I already have a rear bumper, and a rear lip, but the existing bumper has had a bump at some point, which would require a bit of work and filler to sort out, and the rear lip I have was half repaired years ago but mould has taken to the (unpainted) repairs and this would all need to be undone requiring loads of work. Can’t really be bothered with that right now.
The new bumper is a UK one with the fog light hole, which I don’t want so I set to correcting this. A bit of soldering iron action later….

And where did I get the repair patch?

Seems a bit bonkers really! Anyway, some primer and a rub down.


Then some more primer to ensure that the repair won’t show after the topcoat, I did this as I could see that it would after the first rub-down.

Now onto the two rear quarter panels, the nearside was still just at weld stage, as I had just brushed some epoxy over this just before I moved house a year ago. So this needed dressing, filler and primer. Due to time constraints I completely forgot to take pictures until it looked like this…


Painted with epoxy mastic, which is just fantastic; it fills any sanding marks like a filler primer but is fully waterproof, which I need due to being outside. I think you could easily just use it as a top coat.
So I gave it a few days to cure, then went at it with some 400’s/600’s/800’s leaving a nice flat surface for the top coat. The only problem with the paint is that it dries really hard, so flatting took ages.


At this point I had broken through the primer in a few small places and realised that the paint on the C pillar is pretty poor, it has a crazed and cracked effect from paintwork done before I owned the car. So I decided to take this area down to remove the crazing and apply a total coat over all of it.

Thank goodness I was not on the top coat stage, my gun started to play up bigtime whilst doing this, this is completely due to the fact that I’m so lazy when it comes to cleaning my paint gun and also I didn’t bother to filter the paint. I managed to get it working in a fashion obviously, and given it’ll be flatted down it’s not too much of an issue. So once set I gently flatted it down with some 800’s.

Whilst this was all going on I did some work to the o/s quarter too. The shape was not quite right, so I reworked it slightly with some filler and then a coat of some epoxy mastic.

Flatted that down too along with the bumper.


Now is a good time to strip and clean the paint gun so hopefully I have no more issues, it’s pretty critical that it works as intended.
A little bit of colour.


And some lacquer.


Before fitting the skirts and rear bumper, I slapped plenty of dynax underbody to hopefully prevent any rust.


I’ve also swapped some dodgy looking exhaust hangers for some uprated ones.

Putting it back together.


The bumpers and panel gaps still need a little adjustment, but I'll wait until the paint is not so soft until I do this.
The day before doing the painting (yesterday) I realised that the steering lock was not working, which would be an MOT fail, so I had to strip down the lock and barrel to see why, in the end it turned out to be a small spring and metal arm that forms part of the auto magnetic lock system, it must have been like this since converting to a manual. So an hour later and 9pm I was done. BUT, the day after (i.e. about 2 hours ago), I went to turn the steering wheel for some reason or another, and then discovered the key would not turn properly, so I stripped it all down again to find this little bugger clogging up the works. Once removed, all works as intended.

So, off to the MOT station 9am tomorrow morning…………
Right, so I’ve been rather busy on this recently as some of you know, and have made some good progress……….
Firstly was the final bit mechanically, which was the alternator, after running the car the battery light is still on, and coupled with the fact that I had somehow bent the shaft on it whilst stripping and rebuilding it, you could see the pulley wobbling like mad when running, I’ve just replaced it with a known working one curtesy of Wurlycorner, which I collected from him whilst he was procuring a French boat not too far from my place.
Removing the existing pulley proved rather difficult, I tried a multitude of different approaches, before finally ending up at pure brute force.
Once the pulley was swapped, I popped in the new voltage regulator I had bought, painted it black (as I had run out of silver paint at this point) and popped the nicely polished little cover on.
So that was that, now onto the (basic) music. I fiddled with the headunit that had been sat in the car for the last 5 years, plugged it in and it lit up straight away, great. But then I attempted to load a CD and it just grumbled for a bit and spat it out again. Having spent more money than I’ve already planned to over the last few months, I went onto the bay and picked up the cheapest unit I could just so I had something. £14 later I was the proud owner of some random brand unit, though it does have 2 pre-outs as well as SD card and USB malarkey, which is probably a good thing as the glove box can probably hold 1 CD maximum (I’d forgotten how useless it was).
After swapping the units over, I thought I’d crack open the other unit to see what was its problem, typically about half an hour later I had found the issue and it was functional again.
I dug out some spare door trims that I bought a fair while back (so long ago they had my old, old address still on the packaging), and swapped them for the rather rough ones that were on the car.
At the same time, I took some time out to do a bit of maintenance to the stuff in the doors, with a good chance of stuff seizing through not being used for so long, I greased the window motors, runners and guides, as well as the check straps and door locking mechanisms. All the windows and locks now operate quite nicely.
I’ve also fitted some facelift tweeter covers in the dash.
So, onto the bodywork. I obtained a new rear bumper and rear euro lip at the national meet from W1ggs. I already have a rear bumper, and a rear lip, but the existing bumper has had a bump at some point, which would require a bit of work and filler to sort out, and the rear lip I have was half repaired years ago but mould has taken to the (unpainted) repairs and this would all need to be undone requiring loads of work. Can’t really be bothered with that right now.
The new bumper is a UK one with the fog light hole, which I don’t want so I set to correcting this. A bit of soldering iron action later….
And where did I get the repair patch?
Seems a bit bonkers really! Anyway, some primer and a rub down.
Then some more primer to ensure that the repair won’t show after the topcoat, I did this as I could see that it would after the first rub-down.
Now onto the two rear quarter panels, the nearside was still just at weld stage, as I had just brushed some epoxy over this just before I moved house a year ago. So this needed dressing, filler and primer. Due to time constraints I completely forgot to take pictures until it looked like this…
Painted with epoxy mastic, which is just fantastic; it fills any sanding marks like a filler primer but is fully waterproof, which I need due to being outside. I think you could easily just use it as a top coat.
So I gave it a few days to cure, then went at it with some 400’s/600’s/800’s leaving a nice flat surface for the top coat. The only problem with the paint is that it dries really hard, so flatting took ages.
At this point I had broken through the primer in a few small places and realised that the paint on the C pillar is pretty poor, it has a crazed and cracked effect from paintwork done before I owned the car. So I decided to take this area down to remove the crazing and apply a total coat over all of it.
Thank goodness I was not on the top coat stage, my gun started to play up bigtime whilst doing this, this is completely due to the fact that I’m so lazy when it comes to cleaning my paint gun and also I didn’t bother to filter the paint. I managed to get it working in a fashion obviously, and given it’ll be flatted down it’s not too much of an issue. So once set I gently flatted it down with some 800’s.
Whilst this was all going on I did some work to the o/s quarter too. The shape was not quite right, so I reworked it slightly with some filler and then a coat of some epoxy mastic.
Flatted that down too along with the bumper.
Now is a good time to strip and clean the paint gun so hopefully I have no more issues, it’s pretty critical that it works as intended.
A little bit of colour.
And some lacquer.
Before fitting the skirts and rear bumper, I slapped plenty of dynax underbody to hopefully prevent any rust.
I’ve also swapped some dodgy looking exhaust hangers for some uprated ones.
Putting it back together.
The bumpers and panel gaps still need a little adjustment, but I'll wait until the paint is not so soft until I do this.
The day before doing the painting (yesterday) I realised that the steering lock was not working, which would be an MOT fail, so I had to strip down the lock and barrel to see why, in the end it turned out to be a small spring and metal arm that forms part of the auto magnetic lock system, it must have been like this since converting to a manual. So an hour later and 9pm I was done. BUT, the day after (i.e. about 2 hours ago), I went to turn the steering wheel for some reason or another, and then discovered the key would not turn properly, so I stripped it all down again to find this little bugger clogging up the works. Once removed, all works as intended.
So, off to the MOT station 9am tomorrow morning…………
Last edited by Vtecmec on Sun Aug 17, 2014 10:21 pm, edited 1 time in total.
-
wurlycorner

- Ye are glad to be dead, RIGHT?
- Posts: 21511
- Joined: Sat May 19, 2012 3:33 pm
- My Generation: 4G
- Location: Chelmsford, Essex
- Has thanked: 2507 times
- Been thanked: 317 times
-
Vtecmec
- LotM Winner
- Posts: 5496
- Joined: Fri Aug 06, 2010 5:43 pm
- My Generation: 4G
- XBOX GamerTag: vtecmec
- Location: East Midlands
- Has thanked: 152 times
- Been thanked: 442 times
-
paul bristol uk
- Moderator
- Posts: 1896
- Joined: Wed Aug 04, 2010 11:51 pm
- My Generation: 4G
- Location: In a world of my own
I have followed this thread from the start and I have been so amazed at the high standard of work and attention to detail you have put into it ! In my opinion this is the best rebuild thread I have ever seen. Without doubt I think this is the best Lude on the forum.
Again best of luck for tomorrow!
Again best of luck for tomorrow!
I have kleptomania,
But when it gets bad,
I take something for it.
But when it gets bad,
I take something for it.