
Congratulations to vtecmec for winning May/June's Lude Of The Month, with his DIY Turbo BB1 build.
>>> Click Here For Profile <<<

>>> Click Here For Profile <<<
Vtecmec's 4th Gen


-
Vtecmec
- LotM Winner
- Posts: 5496
- Joined: Fri Aug 06, 2010 5:43 pm
- My Generation: 4G
- XBOX GamerTag: vtecmec
- Location: East Midlands
- Has thanked: 152 times
- Been thanked: 442 times
Rocker cover, crossmember, prelude light, 4WS Alignment
So, still not finished yet.
But getting ever closer, I pressed on with the valve timing and filled up all the fluids.

Derusted the front crossmember.

And painted and fitted the front engine mount.

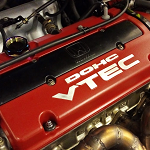
Then turned my attention to the rocker cover, which needed a spruce as it had plenty of scratches.
So I stripped it down.

And painted, the pic of the colour is for my own reference as for the life of me could not remember what colour I used last time.


And off with the paint on the letters. It’s a nervous process.

Then all back together and time to turn the key…….

And nothing. The starter would not even attempt to turn. So I checked it was getting a live, and it was, so I scratched my head for a few minutes and then eureka, so it has a live but does it have an earth, well it should do but because I’ve painted the gearbox, and the starter, and the bolts, everything was isolated, so I whipped one of the bolts out and removed the paint from the inner side, and did the same with the corresponding spot on the starter……..so back to the key……..turn it……and she’s alive! Phew.
Now it runs, paranoia sets in and I feel an absolute urgency to fit the fancy electronic immobiliser that I had bought some time in the past, but firstly there was an old alarm immobiliser to remove, which ended up as this pile of wires.

Once all this was out, I could get round to fitting the immobiliser, obviously no pics of this, which is a shame as it’s probably one of the neatest things I have done, I am no fan of electrics and usually just bodge my way to a solution, but not this time.
Whilst doing all of this I also swapped out the JDM cruise control ECU for a UK one, which should remove the cruise controls 60mph speed limit.
Next was to dig out these Honda access tail pipe trims that have been gathering dust for a while.

And on the car, which took a bit of work as I had to cut off the old trims with an angle grinder in the end.

Now, I have a rear prelude light in the back window, well I say light but it’s useless at the moment as it has a thick layer of some really sticky stuff on the back stopping any light getting through. I think most of them are like this and renders them useless. So I thought I’d have a go at removing this stuff. It’s as delicate as hell and easily damaged.
At the start.

Halfway through using a spreader tool at 30 degrees and a sawing motion.

I repeated the sawing motion several times in many different directions, then finished off the last remnants with some 800’s wet and dry paper, leaving this…

Hooray, after lots of sweating and worrying that I might damage it. I’ve still to see what it looks like when working as I have no bulbs but have some on order.
So then moving round the car, I’ve double checked and re-torqued all the rear and front suspension, just to be sure. Which then led me onto the alignment. Now Honda quoted me only £50 for the setup, but you can probably glean that I am keen on doing everything myself on this thing, so I did my own alignment.
I made my own camber checking tool, some really high tech stuff here.

You can only adjust the rears, which makes things easier, and the fact that it is lowered pulls the camber out beyond spec anyway. So I pulled one side in as far as it would go, and simply adjusted the other side to match, which by not too great a coincidence was as far as that could go too.


You can see here how far out the tracking is, not surprising considering everything has been apart/replaced etc.

First thing was to sit the car on slabs so I can crawl under and get to the bolts without jacking it up.

Once set I loosened all the adjusting bolts and being 4WS, I locked the rear rack centre with a locking pin.

Then I pulled the wheels as straight as I could by eye, meaning that it should not need much adjustment with the ‘equipment’ in place. I say ‘equipment’ as to do this I used 4 stands, 4 mole grips, 2 long pieces of wood and a length of string.
To do this I set the stands on each corner, straddled the front and rear ones with the lengths of wood and then strung the string front to rear on each side, ensuring that the string was tied at equal distances on each length of wood.

This gives a string running down each side of the car.

With a bit of measuring and careful adjustment, measuring the string offset from the centre of each wheel you end up with 2 parallel lines running down the side of the car. I realised after a while that the centre caps were throwing me off, so I took measurements off the wheels at each side of it eventually.

Now it’s just a case of measuring the distance of the front and rear of each wheel relative to the string to check if they are straight or not.


Amazingly, 3 of the 4 wheels that I had eyed in were perfectly straight. So I adjusted the 4th and locked the fronts I then I adjusted the rears to give the 2 degs of toe in that is required and finally locked those into place. After this I readjusted the camber again, and then reset the string and rechecked each wheel. Perfect.
Whilst doing this I noticed just how bad one of the rear tyres were, it looked crap anyway and the rears are odd, so I’ve just ordered 2 matching tyres for the rear.

That’s it so far, just a few bit to finish off for the MOT, but it’s really a case of finances making me wait rather that my own lack of progress.
But getting ever closer, I pressed on with the valve timing and filled up all the fluids.
Derusted the front crossmember.
And painted and fitted the front engine mount.
Then turned my attention to the rocker cover, which needed a spruce as it had plenty of scratches.
So I stripped it down.
And painted, the pic of the colour is for my own reference as for the life of me could not remember what colour I used last time.
And off with the paint on the letters. It’s a nervous process.
Then all back together and time to turn the key…….
And nothing. The starter would not even attempt to turn. So I checked it was getting a live, and it was, so I scratched my head for a few minutes and then eureka, so it has a live but does it have an earth, well it should do but because I’ve painted the gearbox, and the starter, and the bolts, everything was isolated, so I whipped one of the bolts out and removed the paint from the inner side, and did the same with the corresponding spot on the starter……..so back to the key……..turn it……and she’s alive! Phew.
Now it runs, paranoia sets in and I feel an absolute urgency to fit the fancy electronic immobiliser that I had bought some time in the past, but firstly there was an old alarm immobiliser to remove, which ended up as this pile of wires.
Once all this was out, I could get round to fitting the immobiliser, obviously no pics of this, which is a shame as it’s probably one of the neatest things I have done, I am no fan of electrics and usually just bodge my way to a solution, but not this time.
Whilst doing all of this I also swapped out the JDM cruise control ECU for a UK one, which should remove the cruise controls 60mph speed limit.
Next was to dig out these Honda access tail pipe trims that have been gathering dust for a while.
And on the car, which took a bit of work as I had to cut off the old trims with an angle grinder in the end.
Now, I have a rear prelude light in the back window, well I say light but it’s useless at the moment as it has a thick layer of some really sticky stuff on the back stopping any light getting through. I think most of them are like this and renders them useless. So I thought I’d have a go at removing this stuff. It’s as delicate as hell and easily damaged.
At the start.
Halfway through using a spreader tool at 30 degrees and a sawing motion.
I repeated the sawing motion several times in many different directions, then finished off the last remnants with some 800’s wet and dry paper, leaving this…
Hooray, after lots of sweating and worrying that I might damage it. I’ve still to see what it looks like when working as I have no bulbs but have some on order.
So then moving round the car, I’ve double checked and re-torqued all the rear and front suspension, just to be sure. Which then led me onto the alignment. Now Honda quoted me only £50 for the setup, but you can probably glean that I am keen on doing everything myself on this thing, so I did my own alignment.
I made my own camber checking tool, some really high tech stuff here.
You can only adjust the rears, which makes things easier, and the fact that it is lowered pulls the camber out beyond spec anyway. So I pulled one side in as far as it would go, and simply adjusted the other side to match, which by not too great a coincidence was as far as that could go too.
You can see here how far out the tracking is, not surprising considering everything has been apart/replaced etc.
First thing was to sit the car on slabs so I can crawl under and get to the bolts without jacking it up.
Once set I loosened all the adjusting bolts and being 4WS, I locked the rear rack centre with a locking pin.
Then I pulled the wheels as straight as I could by eye, meaning that it should not need much adjustment with the ‘equipment’ in place. I say ‘equipment’ as to do this I used 4 stands, 4 mole grips, 2 long pieces of wood and a length of string.
To do this I set the stands on each corner, straddled the front and rear ones with the lengths of wood and then strung the string front to rear on each side, ensuring that the string was tied at equal distances on each length of wood.
This gives a string running down each side of the car.
With a bit of measuring and careful adjustment, measuring the string offset from the centre of each wheel you end up with 2 parallel lines running down the side of the car. I realised after a while that the centre caps were throwing me off, so I took measurements off the wheels at each side of it eventually.
Now it’s just a case of measuring the distance of the front and rear of each wheel relative to the string to check if they are straight or not.
Amazingly, 3 of the 4 wheels that I had eyed in were perfectly straight. So I adjusted the 4th and locked the fronts I then I adjusted the rears to give the 2 degs of toe in that is required and finally locked those into place. After this I readjusted the camber again, and then reset the string and rechecked each wheel. Perfect.
Whilst doing this I noticed just how bad one of the rear tyres were, it looked crap anyway and the rears are odd, so I’ve just ordered 2 matching tyres for the rear.
That’s it so far, just a few bit to finish off for the MOT, but it’s really a case of finances making me wait rather that my own lack of progress.
Last edited by Vtecmec on Tue Jul 15, 2014 10:29 pm, edited 1 time in total.
-
TopPrelude
- Posts: 157
- Joined: Thu Jul 11, 2013 5:01 pm
- My Generation: 4G
- Has thanked: 2 times
